JavaHigh04-强引用、弱引用、软引用、虚引用
本文共 4138 字,大约阅读时间需要 13 分钟。
目录
一、强引用
强引用只要有对象与其关联,gc时必定不会回收这个对象,如果内存不足,JVM会抛出OOM(OutOfMemory)错误也不会回收它。我们日常使用的大多数情况,基本上都是强引用
String str1 = new String("aa"); String str2 = str1; str1 = null;//置空 System.gc();; System.out.println(str1); System.out.println(str2); 二、软引用
软引用就是内存够用时不会回收,但内存不够时会回收。
内存够用的情况下:public void softRef(){ Object obj1 = new Object(); SoftReference 内存不够用的情况下:
配置内存为5M -Xms5m -Xms5m -XX:+PrintGCDetailspublic void softRefNotRnoughMemory(){ Object obj1 = new Object(); SoftReference 三、弱引用
弱引用在gc时,不管内存够不够用,都会被回收掉
//弱引用,只要有gc,统统回收掉 public void weakRef(){ Object obj1 = new Object(); WeakReference 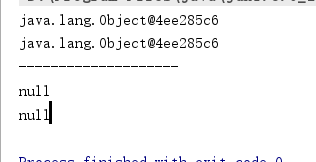
案例:某个应用读取大量的本地图片,如果每次都从磁盘读取则会严重影响性能,一次性全部加载内存又可能造成内存溢出,使用软引用可以解决这个问题
思路:用一个HashMap保存图片的路径和相应图片对象关联的软引用或弱引用之间的映射关系,内存不足时自动回收,即可避免OOM问题。 Map<String,SoftReference> imageCache = new HashMap<String,SoftReference>();WeakHashMap在做缓存时常用,以下是案例:
正常的HashMappublic void myHashMap(){ HashMap map = new HashMap<>(); Integer key = new Integer(1); String value = "HashMap"; map.put(key,value); System.out.println(map); key =null;//这个key和hashMap的key没有关系 System.out.println(map); System.gc(); System.out.println(map+"\t"+map.size()); } 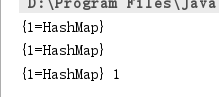
弱引用HashMap,当value为空时,不会阻止被回收,其他基本上一样
public void myWeakHashMap(){ WeakHashMap map = new WeakHashMap<>(); Integer key = new Integer(1); String value = "HashMap"; map.put(key,value); System.out.println(map); key =null;//这个key和hashMap的key没有关系 System.out.println(map); System.gc(); System.out.println(map+"\t"+map.size()); } 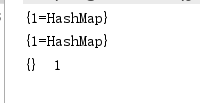
四、虚引用
顾名思义,虚引用,就是引用形态虚设,在任何时候都可能会被gc回收,不能单独使用,也不能通过它访问对象,必须和ReferenceQueue引用队列联合使用。在被回收之前,要被队列保存一下
使用场景:在这个对象被收集器回收的时候收到一个系统通知或者后续添加进一步的处理(死刑之前做点什么,作为最后的价值) 先介绍下引用队列的使用:public void virtualRef() throws InterruptedException { Object obj1 = new Object(); ReferenceQueue 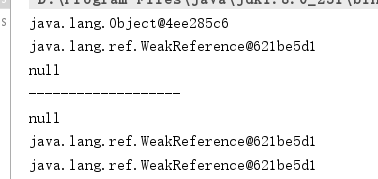
虚引用
public void phantomRef() throws InterruptedException { Object obj1 = new Object(); ReferenceQueue 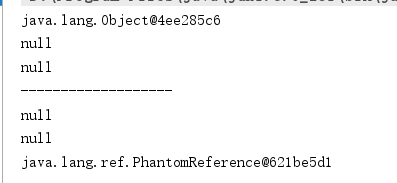
转载地址:http://cgmb.baihongyu.com/
你可能感兴趣的文章
nodejs图片转换字节保存
查看>>
nodejs在Liunx上的部署生产方式-PM2
查看>>
nodejs基于art-template模板引擎生成
查看>>
nodejs字符与字节之间的转换
查看>>
NodeJs学习笔记001--npm换源
查看>>
NodeJs学习笔记002--npm常用命令详解
查看>>
nodejs学习笔记一——nodejs安装
查看>>
vue3+Element-plus icon图标无法显示的问题(已解决)
查看>>
NodeJS实现跨域的方法( 4种 )
查看>>
nodejs封装http请求
查看>>
nodejs常用组件
查看>>
nodejs开发公众号报错 40164,白名单配置找不到,竟然是这个原因
查看>>
Nodejs异步回调的处理方法总结
查看>>
NodeJS报错 Fatal error: ENOSPC: System limit for number of file watchers reached, watch ‘...path...‘
查看>>
nodejs支持ssi实现include shtml页面
查看>>
Nodejs教程09:实现一个带接口请求的简单服务器
查看>>
nodejs服务端实现post请求
查看>>
nodejs框架,原理,组件,核心,跟npm和vue的关系
查看>>
Nodejs概览: 思维导图、核心技术、应用场景
查看>>